Category Archives: BAKING

The Perfect Shabbat Deli Roll!

So I’ll be honest with you guys and tell you I’m not much of a Deli Meat fan but I actually really like this Deli Roll. I read several recipes and customized the recipe to my taste and the preference of the guests I was catering to.  This recipe I have here is most similar to Jamie Geller’s Recipe which can be found on JOY OF KOSHER WEBSITE.

Here is the link to Jamie Geller’s Recipe and you can watch a video of her making it so it can really help you to visualize it all: LINK AND VIDEO .

Except for the fact that this is a delicious recipe, I love it because it is so simple to make and looks great. It happens to be a good dish to make when you are serving guys. It’s one of those dishes often served at the Friday night dinner in many Jewish homes.

Ingredients:

  • 1 frozen puff pastry, defrosted
  • 3 slices pastrami
  • 3 slices turkey
  • 3 slices corned beef
  • 1 egg
  • 3 teaspoons sesame seeds
  • 1/4 cup Ketchup
  • 1/4 cup Deli Mustard
  • (BBQ sauce if desired)

Preparation:

  1. Preheat oven to 350 degrees F. Lightly grease a 12 x 15-inch cookie sheet with non-stick cooking spray.
  2. Unfold puff pastry sheet onto prepared cookie sheet.
  3. Spread ketchup and mustard over pastry sheet with a pastry brush (and BBQ sauce if you are using it).
  4. Place meats layers.
  5. Roll dough and place seam side down.
  6.  Brush with beaten egg and sprinkle with sesame seeds.
  7. Bake, uncovered, at 350 degrees for 45 minutes until slightly browned and flaking. Let stand 5 minutes before slicing and serving.

FOOD FOR THOUGHT:

” I never heard of deli rolls until I hit the kosher Shabbos scene. It was apparent that everyone I visited knew how to make them. So I figured I’d better learn if I wanted to be really kosher”

~ Jamie Geller

Speak to you soon,

                  Nicole Doreen

Healthy Homemade Granola!

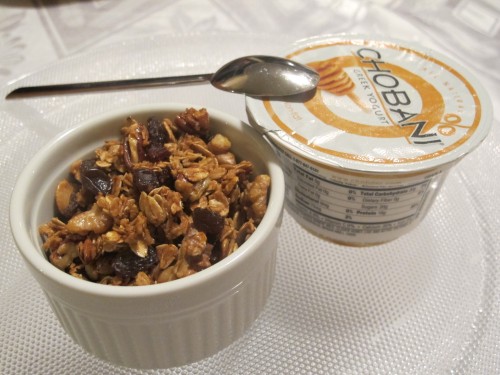
I absolutely love granola but the commercial granola is always filled with calories, fat and sugar. Making homemade granola may sound like a challenge but it’s actually pretty simple and tastes delicious. Last week I made 4 batches of granola and packaged it to give out to my family and friends. I sometimes package granola is small bags and they make very cute gifts.

I often experiment with different add-ins and different recipes. Granola can be a healthy snack, a perfect salad topping or my favorite is to eat it for breakfast in my yogurt parfait.  If you like it sweet and sticky just add a bit more honey and add dried fruit bits after the granola cools. Or you can put less honey/sugar mixture and omit the dried fruit add-ins to limit the sweetness. The best part about homemade granola is that you make it to your personal taste and you can always substitute parts of the recipe for whatever you have in your kitchen.

Here’s my recipe that I tried at least 10 times and absolutely love- I like it sweet and crunchy! Every time I make a batch it somehow disappears the first day!

Ingredients:

  • 2cups old fashioned rolled oats
  • 1/4 cup honey
  • 1/4 cup packed brown sugar
  • 2 tablespoons vegetable oil
  • 1 teaspoon vanilla extract
  • 2 teaspoons ground cinnamon
  • ½ cup chopped pecans (unroasted, unsalted)
  • ½ cup chopped walnuts (unroasted, unsalted)
  • ½ cup raw sunflower seeds (unroasted, unsalted)
  • ½ cup green pumpkin seeds (unroasted, unsalted)
  • ¾ cup raisins

Preparation:

1. Preheat oven to 350 degrees and prepare baking pan lined with parchment paper

2. In a large bowl, combine oats, nuts and seeds

3. In a saucepan, combine brown sugar, oil, honey and cinnamon; bring to a boil then lower heat/simmer until smooth

4. Remove from the heat and stir in vanilla extract

5. Pour over oat mixture; and stir to evenly coat

6. Spread in a large shallow ungreased baking pan lined with parchment paper

7. Bake at 350 degrees F for 15 to 20 minutes, stirring every 5 minutes for even baking and as not to burn the nuts and oats on the edges.

8. Cool

9. Add raisins and dried fruit

10. Store in an airtight container.


FOOD FOR THOUGHT:

“So munch on, crunch on, take your nucheon, / Breakfast, supper, dinner, luncheon!”

~ Robert Browning

Speak to you soon,

                  Nicole Doreen

Nuts about Nuts? Try Candied Nuts !!

Candied/Glazed Nuts

A few years ago I went through a “love for almonds” phase… then I tasted glazed almonds… and let’s just say I thought they were delicious. Ok I admit that I may have overdone it but in moderation nuts are extremely healthy for you as well as tasty.

Candied nuts are great as a sweet and crunchy snack or even on top of a salad. They are so easy to make at home and they taste amazing.

I found this recipe in one of my favorite cookbooks which is by far one of my best purchases:  Kosher By Design: Short on Time By Susie Fishbein.

Here is a link to this book so you won’t get confused because she has several different ones:

http://www.barnesandnoble.com/w/kosher-by-design-susie-fishbein/1005804584

Ingredients:

  • 8oz of mixed nuts- almonds, pecans, cashews, walnuts (use whichever you prefer)
  • 1/2 cup sugar
  • ¼ cup water
  • 1.5 tablespoons honey

Preparation:

  1. Preheat the oven to 350 degrees F.
  2. Line a cookie sheet with parchment paper.
  3. In a small saucepan, combine the sugar, water and honey and simmer until the sugar is completely dissolved.
  4. Put the nuts in a large bowl and spill Sugar-Water mixture on it. Mix to evenly coat all the nuts.
  5. With a slotted spoon transfer the nuts onto the cookie sheet in a single layer without putting any on top of each other.
  6. Bake for about 10-12 minutes.
  7. Remove from cookie sheet onto another tray lined with parchment paper and let the nuts cool.
  8. Serve once they cooled and store in an airtight container.

FOOD FOR THOUGHT:

“Preserving the health by too strict a regimen is a wearisome malady.”

~ François Duc de la Rochefoucauld

Speak to you soon,

                  Nicole Doreen

It’s all about the Pumpkin Pie!

Pumpkin PIe

Squash is now in season and Thanksgiving is coming up. What better way to prepare than by making a pumpkin pie?

I will be honest with you guys … until last year I have never tasted pumpkin so this year I decided to experiment and try different recipes that call for pumpkin. I came to the conclusion that even though my Vegetable Curry came out delicious, I personally prefer eating pumpkin in my sweet desserts.

I subscribed to several food magazines and online websites and have been overwhelmed with the many pumpkin recipes I have seen. I read a bunch of pie recipes and although they are all very similar they often each have a unique twist.

I made one big pie and then several mini ones. Most recipes call for the flaky dough but I wanted to try it with graham cracker crust and see how it would come out. I had several of my friends taste it and they gave my recipe “two thumbs up”.

So here goes:

Ingredients:

  • 1 large and 5 mini  Graham Cracker Pie Crusts
  • One 15oz can of Pumpkin
  • One 12oz can of Evaporated milk
  • 2 Eggs lightly beaten
  • 3/4 cup Sugar
  • 2 tsp Cornstarch
  • 1 tsp Cinnamon
  • ¼ tsp Nutmeg
  • ¼ tsp Salt
  • 2 drops Vanilla Extract

Preparation:

  1. Preheat the oven to 425 degrees F.
  2. In a small bowl combine the sugar, salt, cinnamon, nutmeg and cornstarch.
  3. Beat eggs lightly in a large bowl add the vanilla extract.
  4. Stir in pumpkin and sugar-spice mixture.
  5. Gradually stir in evaporated milk.
  6. Pour into pie crusts and carefully put them in the oven.
  7. Bake for 15 minutes then reduce the temperature to 350 degrees F. Once the crust begins to brown cover the edges so they won’t burn then continue to bake. Bake for about 45 minutes or until toothpick comes out clean.
  8. Let the pies cool and then serve alone or with whip cream. Refrigerate the pies.

Mini Pumpkin Pies

FOOD FOR THOUGHT:

“Vegetables are a must on a diet; I suggest carrot cake, zucchini bread, and pumpkin pie.”

~ Jim Davis

Speak to you soon,

                  Nicole Doreen

Super Healthy and yet still Super Tasty Bean Broccoli Veggie Burger

Bean Broccoli Burger

So I am currently in a Veggie Burger making phase. I have been trying new recipes left and right and have been reading a lot!

Last night I decided to experiment and make my own veggie burger recipe which I personally think came out great! The fact that I made so many and they all finished so quickly definitely proved to me that I am not the only one who thinks they are awesome. The reason I am such a huge fan of this recipe is because it is packed with extremely healthy ingredients and also I think they taste even better baked than fried.

Ingredients:

  •  1 can chickpeas- rinsed and strained (chopped in food processor)
  • 1 can white beans (chopped in food processor)
  • 1 can corn
  •  1 onion (diced small)
  • 1/2 head of broccoli (chopped in food processor)
  •  2 cloves garlic- minced
  •  ½ cup parsley- small dice
  • 2 tablespoons bread crumbs
  • 2 tablespoons Flour
  • ½ teaspoon Cumin
  • ¼ teaspoon Turmeric
  • Pinch of Chili powder
  •  Salt/ Black Pepper To Taste

Preparation:

  1. Preheat Oven to 365 degrees.
  2. Sautee garlic and onion in olive oil and mix all spices/seasonings in.
  3. In food processor chop the chickpeas, white beans, and broccoli then add them to bowl with the chopped parsley, corn, bread crumbs and flour.
  4. Combine it to the onion/garlic mixture. Fix and form burgers. Place on a baking sheet sprayed with cooking spray or Pam.
  5. Bake in oven for about 30 minutes then hit with broil for a few minutes and flip to the other side also. (when you change it to broil watch the burgers as they burn rather quickly).

Serve Hot with mustard, ketchup, hummus, tahini or whatever you enjoy most!

FOOD FOR THOUGHT:

“You don’t have to cook fancy or complicated masterpieces- just good food from fresh ingredients”

~ Julia Child

Speak to you soon,

                  Nicole Doreen